Banner 468

Featured entries
Showing posts with label Tricks. Show all posts

windows 8 usb installation

Posted by Saqlain1020 on - -


Steps for Windows 8 USB Installation

First of all Download this program. This is Microsoft genuine tool to make usb drive bootable
download button

After you have downloaded above Windows 8 USB tool. Now follow below steps.
Open this tool from your programs.
Windows 8 USB Installation

Then Click on Browse button and go to path where your windows 8 iso file is located. If you haven’t download windows 8 then you can download windows 8 Pro.
Windows 8 USB Installation
Click on WIndows 8 iso file and click on Open button.
Windows 8 USB Installation

Now from options click on USB Device.
Windows 8 USB Installation
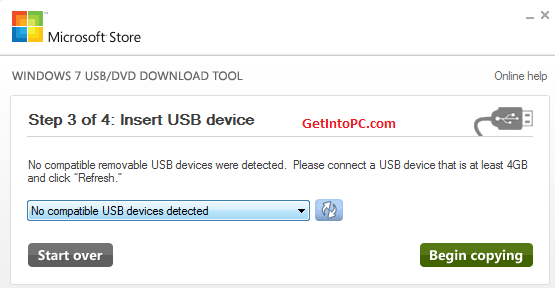
From Drop Down box select your USB Pen drive letter e.g. H: or I: or G: and then click Begin copying. After the process is completed the USB is now bootable.
Turn off your computer and plugin USB. Now Turn on PC and boot from USB. Done.
If you have any issues with this tutorial then please comment here
[ Read More ]

Turn Off (Disable) Autorun Feature of All Drives in Windows without Any Tool

Posted by Saqlain1020 on - -


Ds, DVDs & PenDrives containing viruses or malwares make use of the AutoRun feature in Windows to infect your computer as soon as they were loaded. AutoRun was introduced with Windows 95 so a CD or DVD that contained a file called autorun.inf would start up when it was loaded in the CD drive.


AutoPlay was added in Windows XP and is also in Windows Vista. AutoPlay brings up a dialog box when any removable media like CDs, external hard drives or USB memory sticks are attached to the computer. The dialog box gives the user a list of possible actions like open as a folder, cancel, autorun a file, and more.
For the computer user who wants to avoid all possible means of having his or her computer infected the safest thing is to turn off autorun or autoplay.
Go with the following simple steps to turn off Autorun in Windows:
1. Go to Start, Click Run & type gpedit.msc and click OK.

2. It will open the Windows Group Policy. Now in the Group Policy, Click Administrative Templates,
  • For Windows XP click on System
  • For Windows Vista, click on System Components, then Autoplay Policies.
Then Double click on Turn Off Autoplay.
3. Now In the Autorun Properties just popped, select Enabled & then select All Drives in the drop down.
Thats it. Now your windows is safe from unexpected viruses & malwares that infect the windows services using the Autorun feature.
Y
[ Read More ]

Create social sharing widget floating bar in blogger blog

Posted by Saqlain1020 on - -

We have integrated both Addthis and ShareThis service in it. In order to customize the twitter button and others we took the Sharethis default code and customize it to change the button image, bubble size and count text. The widget that we initially developed looks extremely attractive compared to this one. You can see the first designed draft version in the screenshot below: 
float bar for sharing buttons

You can observe that both Twitter, Google Plus, Pinterest and Stumbleupon are displayed with custom shapes, same sizes and different count colors. I spent a lot of time trying to make all buttons of the same size by using a common image linked by a sprite but the only problem with this plugin is that the counts wont show the official numbers registered at Twitter, Google and pinterest servers but they will show increments registered at ShareThis. If you add this sharing bar to your blog, you will see zero on all counters unless someone clicks them and circulates your content.
To correct this issue I had to unfortunately dropped the idea of sharing the above designed version and share this tutorial widget instead. However the widget on our blog still contains the twitter button which wont display official count but that of ShareThis. If you would like to replace it with the official big size twitter count box then you can surely do this by customizing the code shared below.
Adding Floating Bar To Blogger
The steps are kept extremely easy to apply. All you need is to copy and paste the long chunk of code we developed and tested all day. Follow these friendly steps: 
  1. Go to Blogger > Template
  2. Backup your template
  3. Click Edit HTML
  4. Click Proceed
  5. Then Click Expand Widget Templates
  6. Search for
<b:includable id='post' var='post'>
      7.   Just below it paste the following code: 
<b:if cond='data:blog.pageType == &quot;item&quot;'>
<b:if cond='data:blog.pageType != &quot;static_page&quot;'>
<style>
.mbt_social_floating{
    position:fixed; bottom:10%; margin-left:-60px; float:left;     width:60px;
    background-color:#f7f7f7;     padding: 5px 0 0px 0px;
     border-top:1px solid #ddd;
border-left:1px solid #ddd;
border-bottom:1px solid #ddd;
z-index:9999px !important;
border-radius:5px;-moz-border-radius:5px;-webkit-border-radius:5px;
}
.mbt_social_floating .mbt_side_social_button{
    margin-bottom:5px;
    float:none;
    height:auto;
    width:60px;
}
.mbt_social_floating .st_twitter_vcount, .mbt_social_floating.st_plusone_vcount, .st_email{
    margin-left:5px;
}
.mbt_social_floating .st_fblike_vcount{
    margin-left:5px;
}
.mbt_social_floating .stButton_gradient{
    background:none !important;
    height:21px !important;
    padding-left:0 !important;
}
.mbt_social_floating .chicklets, .mbt_social_floating .stMainServices {
    background:url(&#39;https://blogger.googleusercontent.com/img/b/R29vZ2xl/AVvXsEhun_o5tDzuvFFm_Lr14I1cfUrQORx3zpFAKCUaq9OGJ2wSJahaelHvlNmoocunZtFNNdRBDcz3imxl_OIXpYkX1KioKNqJYoHaBr0DAeVgvtWwCOW5xgMxHtZTtapkmYjqlyXZ536it5W9/s400/gc_social_sprite.gif&#39;) no-repeat !important;
    height:19px !important;
    width:45px !important;
    padding:0 !important;
}
.st_email .chicklets{
    background-position:0 -77px !important;
    background-image:url(&#39;https://blogger.googleusercontent.com/img/b/R29vZ2xl/AVvXsEhun_o5tDzuvFFm_Lr14I1cfUrQORx3zpFAKCUaq9OGJ2wSJahaelHvlNmoocunZtFNNdRBDcz3imxl_OIXpYkX1KioKNqJYoHaBr0DAeVgvtWwCOW5xgMxHtZTtapkmYjqlyXZ536it5W9/s400/gc_social_sprite.gif&#39;) !important;
}
.mbt_social_floating .st_twitter_vcount .st-twitter-counter{
    background-position:0 -58px !important;
}
.mbt_social_floating  .stButton_gradient{
    border:none !important;
}
.mbt_social_floating .stBubble_count{
    width:44px !important;
    font-size: 15px !important;
    font-weight: normal !important;
    padding-top:7px !important;
    height:23px !important;
    background:none !important;
}
.mbt_social_floating .st_twitter_vcount .stBubble_count{
    color:#00a6df;
    background-color:#f8fbfc !important;
}

.st_fblike_vcount{
    margin-bottom: 0px;
    display: block;
}
.st_twitter_vcount{
    margin-bottom: 3px;
    display: block;
}

.st_email{
    margin-bottom: 5px; margin-top: 3px;
    display: block;
}
.mbt_social_floating .stBubble{
    background-position: 21px 31px !important;
    height:35px !important;
}.mbt_social_floating .st_pinterest_vcount{
    margin-left:5px;
}
.mbt_social_floating .st_pinterest_vcount .st-pinterest-counter{
    background-position:0 -19px !important;
}
.mbt_social_floating .st_pinterest_vcount .stBubble_count{
    color:#FF0505;
    background-color:#fbf8f8 !important;
}

.mbt_social_floating .st_pinterest_vcount .stBubble{
    background-image:url('https://blogger.googleusercontent.com/img/b/R29vZ2xl/AVvXsEhJH816PIQSL9AtLnJ38pvoqsbDFjd6HslwhJF23MIg2Rcv_45ixb3UGrk8SCXuezZjGBuUrOt822x_wOmYmKz1jt3VEhK67DVQVD1qxFz6veyDEclQgnKpH2CD2DjhrbJ3tS4YaoTbKE4r/s400/bubble_arrow_pinterest.png') !important;
}


.st_pinterest_vcount{
    margin-bottom: 0px;
    display: block;
}

</style>

<div class='mbt_social_floating'>
    <script type='text/javascript'>var switchTo5x=true;</script>
    <script src='http://w.sharethis.com/button/buttons.js' type='text/javascript'/>
    <script type='text/javascript'>stLight.options({onhover:false});</script>
    <span class='st_fblike_vcount' displaytext=''/>
    <span class='st_twitter_vcount' displaytext='' st_via='mybloggertricks'/>
<span class='st_pinterest_vcount' displaytext=''/>
<div style='margin:0px 0 0 5px;'>
    <span class='st_plusone_vcount' displaytext=''/>
</div>
   
<div class='addthis_toolbox addthis_default_style ' style='margin:5px 0px 5px 8px;'>
<a class='addthis_counter'/>
</div>
<script src='http://s7.addthis.com/js/250/addthis_widget.js' type='text/javascript'/>
<script type='text/javascript'>
var addthis_config = {
     ui_cobrand: &quot;MY BLOGGER TRICKS&quot;,
ui_header_color: &quot;#ffffff&quot;,
     ui_header_background: &quot;#0080FF&quot;
}
</script>
<span class='st_email' displaytext=''/>
<p style=' line-height:0px; font-size:10px; font-weight:bold; text-align:center;'><a href='http://www.mybloggertricks.com/2012/05/create-floating-bar-for-pinterest-other.html' style='color:#CAC8C8;'>Widgets</a></p>
</div>
</b:if></b:if>

Just replace mybloggertricks  with your twitter username. 
   8.  Save your template and you are all done! 

Got Questions?

This floating bar would display on post pages only and wont display on homepage. The widget has a white background and floats to the left of blog posts. If incase you want it to float to right then all you need is to edit the part of the code bolded in black. You can surely ask for my help which would be no less than a pleasure. Please post any query you may have in the comment box below. Till then take good care of yourselves and your loved ones. Peace and blessings pals! :)
[ Read More ]

How to download google play store appk files directly on your cpmputer pc

Posted by Saqlain1020 on - -

Normally we can't download apps on the Android market/play store directly to our
computers. It needs to use any android device that installed play store app. However
nowadays there are few methods to download market/play store apps packages (apk)
files to desktop or laptop computer. This method we use Java based windows software
called "Real APK Leecher".
Importance of this kind of software is you can save your smartphone or tablet data
cost. If you don't have a proper data traffic plan, your carrier apply addition charges
according to your download capacity.
Moreover if some applications not available to your device's country and you will
receive "This item cannot be installed in your device's country" you can use this
method for overcome that issue.
Key features,
  • Download favorite free apps using a computer connection.
  • Instantly view play store app page.
  • Search android market by vender name, package name or special name.
  • Download application's logo.
  • How To Download Apps On The Android To Windows Computer.
    This software requires Java run times, if you don't have you can download it in here.
    Its an online installer and wait for a few seconds to complete the process.
    Now download "Real APK Leecher" windows software in here.
    Extract compressed files into a desktop or anywhere on your hard disk.
    Double click on the "Real APK Leecher.exe" file.
    Submit your play Store associated gmail address and its password. If you enable
    Google account second verification, generate application specific password and use
    it instead of real password.
    • Now type you device ID number, that you found using following method (end of this
    • post). 
    • Choose a default folder location for save downloaded apps APK files.
    • Click on the "Save" button.
    • In the main window right side, there is a search box. Type android app names or
    • keywords in it and search app.
    • To download app right click and select "Download" in context menu. Instantly you
    • can see download progress in a  small window.
    Apart from that user can view app on the play store page by click on "view on Google
    Play" link in its context menu.
    Once you submit log-in details this tool remember it, so no need to submit them again
    and again.
    How to get android device ID.
    To view a device ID type *#*#8255#*#* on your phone keypad. Now you can see
    "GTalk Service Monitor" window. Tap its "Send heard beat to Server" button. Now scroll
    down until "Device ID: Android-xxxxxxxx" that numbers are your device ID.
    Applying this kind of method you get a risk. If Google ban your Google Play store
    account we can't get its risk.
    Developer site "codeimba."
    Download Real APK Leecher v 1.2.4 "in here".
    [ Read More ]

    How to download toreent using idm

    Posted by Saqlain1020 on - -


    Downloading files over the web using torrent clients is one of the most reliable methods when getting the files we want. But if you have been using this download method for a considerable time now, you should know that there are instances when the download speed is less than desirable, especially with poorly seeded files. Wouldn't it be nice if you could download torrent files in direct download manner? Well here's a nifty trick that will allow you to download torrent using IDM (Internet Download Manager).


    Steps on How to Download Torrent Using IDM (Internet Download Manager)

    NOTE: See UPDATE X1 at the bottom of this post.
    1. First you will need to download the torrent file that you wish to download and save it into your computer.
    2. Download Torrent Using IDM Save Torrent How to Download Torrent Using Internet Download Manager (IDM)? [UPDATED]
    3. Then head over to ZZLBox.com and create an account (required), don't worry it's free.
    4. Download Torrent Using IDM ZZLBox Main How to Download Torrent Using Internet Download Manager (IDM)? [UPDATED]
    5. Now, log-in to your account (after verification) and from the main menu click the Add files(s) button which is located on the top right portion of the site.
    6. Download Torrent Using IDM ZZLBox Add Files How to Download Torrent Using Internet Download Manager (IDM)? [UPDATED]
    7. On the File Add screen, you have the choice of adding files by remote URL (.torrent file, info_hash or magnet link) or by a torrent file saved locally. Click Choose Files and browse for the file you have downloaded in Step 1.
    8. Download Torrent Using IDM Browse Torrent How to Download Torrent Using Internet Download Manager (IDM)? [UPDATED]
    9. Click the Add files(s) button and it should verify the torrent. There should be a green "OK" after the filename.
    10. Download Torrent Using IDM File OK How to Download Torrent Using Internet Download Manager (IDM)? [UPDATED]
    11. Now click on Files from the left panel and it should show you the files that you have just added. If the file is not showing, click the Refresh button from the top panel.
    12. Download Torrent Using IDM Files How to Download Torrent Using Internet Download Manager (IDM)? [UPDATED]
    13. At this point, you can now download the file using ZZLBox's download manager but we'll be using IDM for maximum download speed. On the rightmost side of the file, there should be a download button.Right click on the download button and Copy the link address.
    14. Download Torrent Using IDM Download Button How to Download Torrent Using Internet Download Manager (IDM)? [UPDATED]
      Download Torrent Using IDM Copy Link Address How to Download Torrent Using Internet Download Manager (IDM)? [UPDATED]
    15. Now, launch IDM and click the Add URL button. Paste the link address that you have copied from ZZLBox and Click OK.
    16. Download Torrent Using IDM Main How to Download Torrent Using Internet Download Manager (IDM)? [UPDATED]
      Download Torrent Using IDM Paste Link Address How to Download Torrent Using Internet Download Manager (IDM)? [UPDATED]
    17. Save the file on your desired directory and click Start Download to initiate the download process.
    18. Download Torrent Using IDM Save File How to Download Torrent Using Internet Download Manager (IDM)? [UPDATED]
      Download Torrent Using IDM Download Status How to Download Torrent Using Internet Download Manager (IDM)? [UPDATED]
    And that is how to download torrent using IDM or any supported download manager. I've tested it thoroughly and the download can be resumed without any issues. I'm aware that ZZLBox is still pretty much a beta service at this point, but I find it to be the best in terms of speed. I've explored other options such as Torrific(which is now dead) and ZbigZ (slower speeds and it's frequently down) but ZZLBox just takes the cake. If you have other suggestions on how to download torrent using IDM, feel free to share it in the comments section.
    [ Read More ]

    Add Static Facebook Pop Out Like Box with Smooth Jquery Hover Effect

    Posted by Saqlain1020 on - -


    Hello friends, here's another Facebook jquery pop up for facebook like box widget for bloggers (or) website. Advantages this widget is to free space on the page. Because Facebook can prevent website normal as the box. Static Pop Out Facebook as soft box with jQuery effect of activation for the blogger, this is another cool control. Here I have added as the box with simple jQuery hover effect. See Facebook static plate to the right of the page and move the mouse over the plate with the frame, as is visible by sliding to the left.


    How to Add Static Facebook Like Box with Smooth Jquery Hover for your Blog / website

    Here There are 2 Simple Steps

    Step 1: Adding Jquery JavaScript Plugin(Ignore this step if your blog have already a Jquery Plugin)


    a. Go to Blogger Dashboard < Design tab > Edit Html 
    b. Search for 
     tag ( using ctrl+f)
    c. Add below line of code Before  tag


    And now click Save Template 


    Step 2: Adding Widget Code ( Html code )
    it's Simple 

    a.Layout or page elements –>> Add a gadget->> Html/java script.

    b.Add a below code in the Html/java scipt box.

    Replace my facebook page URL below with the URL for your page.
    (Note:- Facebook URL Must starting with "http://" and it contains no space or illegal Characters )


    Blogger Widgets

    By Blogspot tutorial / +Get This!


    And now click Save 

    Note:-Don’t forget to change Red colour keywords.
    [ Read More ]

    Multi-Color Effect For Your Links On Hover For Blogger / Blogspot

    Posted by Saqlain1020 on - -


    How to create text links in different colors? Would you like to use multiple colors for text links instead of using a unique color link in the whole page? Confused start to tell what the title, purpose ANAA if you want to link touched the pointer to uppercase, bekedip flashing rainbow colors and the background like fireworks or a star-studded.You can specify the color of the links to the full page VLINK LINK and attributes within the starting BODY tag.


    How to add multiple link styles

    Want to make a link to your blog and rainbow-colored flashing when the pointer is affected? It is very easy

    I have to write two set of instructions for each steps, as some of you are using the default layout, and some of you are using the new layout.Backup your template before attempting this tutorial.


    Step 1:


    In old layout: Go to Dashboard - Design - Edit HTML - Expand Widget Templates.


    In new layout: Go to Dashboard - Template - Edit Template HTML - Expand Widget Templates.


    Now find (CTRL+F) this code in the template:


    And exactly before it add the next code :

    Blogger Widgets

    Now Click Save Template 


    And you are done.

    Customize And Demo.
    You can change this value


    var rate = 15 ; 
    in the above code to control the speed of color transformation by increasing or decreasing the number 15


    How to create a rainbow colored hover link


    If you want to use this Multicolor link hover effect on your Blogger Blog
    Then follow below steps


    In old layout: Go to Dashboard - Design - Edit HTML - Expand Widget Templates.

    In new layout: Go to Dashboard - Template - Edit Template HTML - Expand Widget Templates.


    Now find (CTRL+F) this code in the template:


    And exactly before it add the next code :

    Blogger Widgets


    Now Click Save Template 


    How to Add Rainbow Color Effect For Your Links In Hover For Blogger / Blogspot


    Hello friends! Effect of rainbow colors to random colors will give your link on hover. This widget works based on simple JavaScript. Once applied, all the links on the page displays a rainbow effect onmouseover.
    [ Read More ]

    How to change mouse cursor in blogger blog to animated cursors

    Posted by Saqlain1020 on - -


    How to change mouse cursor in blogger blog to animated cursors.One of the best way to add extra fun to your blog is, changing mouse cursor on your blog. Changing the mouse cursor in blogger or blogspot blogs is very easy.This tutorial will help you to change the mouse cursor of your blog to animated cursors.Many bloggers are asking such kind of questions but there is no tutorial available on the internet.I created this post because there are a blogger friend who asked how to change the pointer / cursor on the blogger. This you can do to decorate the look of blog.


    I take the cursor image from http://www.cursors-4u.com and http://rw-designer.com you can change it anytime depends on your festive moods.


    How to Install mouse cursor in blogger blog to animated cursors

    I have to write two set of instructions for each steps, as some of you are using the default layout, and some of you are using the new layout.Backup your template before attempting this tutorial.

    Step 1:

    In old layout: Go to Dashboard - Design - Edit HTML - Expand Widget Templates.


    In new layout: Go to Dashboard - Template - Edit Template HTML - Expand Widget Templates.


    Now find (CTRL+F) this code in the template:


    And immediately before it, paste this code:


    Blogger Templates


    And now click Save Template 


    CHANGE MOUSE CURSOR GENERATOR BY saqlain1020.BLOGSPOT.COM

    How To Add Mouse Cursor Widget To Blogger?

    • Choose a type of Mouse Cursor below
    • Click on "Genetate" button
    • Finally click on "Add to Blogger" to add it to your blog.


    [ Read More ]